Uploading Quick Office HD Pro documents to your Dropbox account on the iPad

If you are wondering how to upload documents from Quick Office Pro to your Dropbox account, there is a way and it is a very straightforward process….

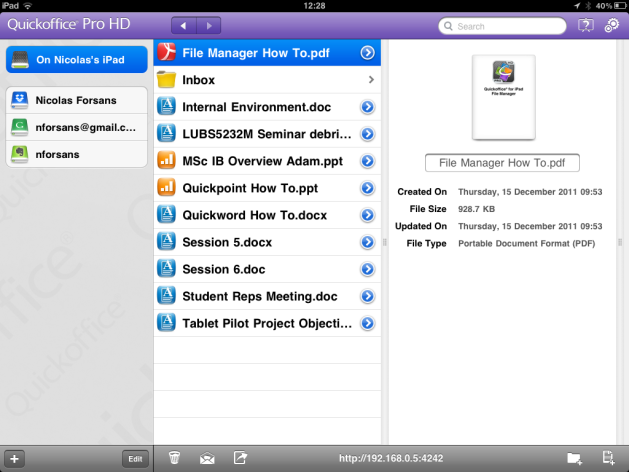
  •  Open Quick Office Pro HD on the iPad and notice on the left hand side both your iPad’s drive (“on Nicolas’s iPad”) and any other cloud-based accounts you might have set up (Go to Settings to set them up). My Dropbox account is referred to as “Nicolas Forsans” in the screenshot below. You can also see my GMail account below it, followed by my Evernote account.
  • Identify the file you’d like to transfer onto your Dropbox account. For the sake of this tutorial I will transfer the default “File Manager How to.pdf” file which comes with Quick Office by default
  • In the same way as you would select the file and send it by email or to the bin (notice the icons at the bottom of the screen, one for the bin, one for email, one for sharing), long-press the selected file name and move it to the icon that represents your Dropbox account on the left-hand side of the screen. Note: I could do the same thing to send it to my Evernote account.

  • As you drag the file to your dropbox account, the file manager no longer displays files that are locally stored onto the iPad – instead it shows you the various files and folders that make up your Dropbox account. You can then drag the file onto one of the sub-folders or (and it ill probably be easier that way) just drag it to the root of your Dropbox folder by releasing it above the Dropbox icon on the left hand side, as I’ve done it on the screenshot – you can always go into your dropbox folder later on and move the file from root to individual sub-folders
  • Job done: your file now appears in your Dropbox account; Obviously you would use the same method to bin the local file by dragging it to the bin icon, email it or send it to any other cloud-based account you might have set up

Creating and accessing pdf documents on the iPad using Save2PDF

We mentioned Save2PDF as a useful app to create pdf files out of websites, documents, contacts and images directly on your iPad. What I did not mention is that Save2PDF is also a good way to access pdf documents while on the go with no wifi connection – as long as your files are stored locally on the device.

In this post I will show you how to create a pdf file using the app, and how to access them for reading on the go. Click on the screenshots to enlarge them!

Creating pdf files

1. Download Save2PDF from the app store and open it on the device. By default, the app will list a file called “Getting started” on the right hand side of the interface. This file comes pre-installed on the device when you download the app, which is why it appears on your file list. This file is a .txt file, and here we will convert it into a pdf document.

2. Select the file by tapping onto it once, and its content will appear in the right hand side window within the app (screenshot)

3. To convert it into a pdf, tap the pdf icon on the top right hand side of the screen (screenshot). You will be presented with a menu similar to one shown here

4. From this menu, you can email it to someone (or yourself) or preview the result. We’ll use the Save function to create a pdf version of that .txt file. Doing so will result in a prompt: where do you want to save the file? We have several options here.

5. Option number 1: save it into the “Documents” folder, as shown by default. Doing so would enable you to save the file locally, and therefore access it without the need of a wifi connection (for example, during a long flight). Click on “Documents”, and the file is automatically saved. You are then asked if it is okay for the app to leave this screen – say Yes, and you return to the default screen. You will notice your file list now includes not just the .txt file we started with, but also the .pdf version of that .txt file (screenshot below). You can use Save2PDF to access pdf files stored in your “Documents” folder: select the .pdf file by tapping onto it, and its content will appear in the right hand side window within the app. You can also view your pdf file in any other app that supports it – see below for more on this.

6. Option number 2: save the file onto one of your cloud services such as Dropbox. By doing so the app will save the output in your Dropbox, box.net, Google Docs or iCloud account and the file will be available from any devices (smartphones, tablets, desktops and laptops) that have Dropbox (and the others) installed onto. If you want to save your output onto your Dropbox but also want the file to be available on your iPad without an internet connection, you will then need to go into your Dropbox using the app on your iPad, navigate to the location where you saved your file, and make the file a favourite by starring the file – this way, the file will be available offline on your iPad.

To save the output into your Dropbox, select the “Local files” drop down menu on Save2PDF (we used the “Documents” folder earlier on to save the file locally) and a number of cloud services will be listed. Tap on the one you want to use, say Dropbox. If this is the first time you’re saving a file into your Dropbox account, the app will ask you for your Dropbox credentials, and once validated your screen will display the folder structure of your Dropbox. Select the folder you want to output saved into, and the file is saved. In no time, it will be available on any other device your have Dropbox installed.

Creating a pdf file out of a website or pictures on your iPad

This is a very similar process to the one aimed at creating a pdf out of a file – the app has a built-in web browser, which means you can take a print out of a web page with you in a pdf format. To do that, select the “Web pages” tab at the bottom of the screen, and using the address bar enter the address of a website.

To make a pdf file out of pictures, select the “Images” tab – and by clicking the “+” icon you can import as many pictures as you’d like from your camera roll and convert them into a pdf file. This could be handy if you’ve taken screenshots of webpages for offline reading.

Once you’ve loaded the webpage or selected the images you want to convert into a pdf format, tap onto the pdf icon on the top right hand corner of the app and follow the steps mentioned earlier.

Viewing your pdf files on the go

We mentioned you could use Save2PDF to view a pdf file you created using the app. There are other (and better) ways to access your pdf files, for example using Amazon’s kindle app, Apple’s iBooks, Adobe Reader and any other office software which we will cover in another post later on.

How to export a pdf file created using Save2PDF for viewing into another app? Easy..!

1. Select the file you would like to access by ticking it (screenshot), then click the fourth con from the left within the app – it offers ample exporting opportunities, such as (1) emailing it to yourself or someone else, (2) exporting the file, (3) moving it to a different location, (4) renaming it, (5) duplicating it, (6) zipping it and (7) opening it into another app.

2. By selecting “Open with App…” you will be presented with a list of apps that support pdf documents, including iBooks, Adobe Reader, QuickOffice, GoodReader etc.

3. If you’d like to annotate the pdf file, I would recommend opening the file with GoodReader or Adobe Reader – both allow for inserting comments, highlighting text etc. If you’d like to save the file and keep it maybe for future reference, why not opening it in iBooks instead and the file will be presented in the same way as a book on a shelf. You can then create collections within iBooks, for example a “Reference” section and move the file into that particular collection. We’ll cover iBooks later on too.

Please feel free to sue the Comments section if you’d like us to cover anything else!
Lots of useful tips for using your iPad

Clipped to my Scoop.it site is an exhaustive list of tips covering every aspect of your iPad – get it there. We’ve covered a number of helpful tips earlier, and I will consolidate all those tips together soon so check again this page for the most exhaustive list of tips (ever produced!).

A selection of the best free apps for the iPad

The list is conveniently organised by categories so you can easily access free apps for the section you are most interested in… You can get the full list by following this link , courtesy of  Gizmo’s, or take a more focused approach by selecting individual links:

  • Best free apps for Home & Office – direct link
  • Best free apps for Image tools – direct link
  • Best free apps for Multimedia – direct link
  • Best free apps for Disk and File Tools – direct link
  • Best free apps for Desktops and Systems – direct link
  • Best free apps for Security and Privacy – direct link – including LastPass which Adam refers to this morning
  • Best free apps for Internet, Email and Messaging – direct link
  • Best free apps for Social Networks, Websites and Servers – direct link
  • Best free apps for Education – direct link
  • Best free apps for Health & Fitness – direct link
  • Best free apps for Games – direct link

Creating mind maps using your iPad

One of the forthcoming training sessions will look at the simple ways for you or students to create mind maps using the iPad. You will find several apps that do the job – one I have used is Mindjet (free) – a simple tool to create (simple) mind maps like the one attached to this post.

Why and when would you want to create a mind map?

Mind maps help structure your thinking about a particular problem, topic, discussion. It highlights the structure of your thinking, and the relationship between various components of it. I tend to use mind maps to structure my own presentations (the one linked to this post refers to a research conference presentation). I also create a mind map in the hour that precedes most of my lectures – I find them useful to remind myself of the structure of the lecture. Whether you might be interested in producing these maps depends on your way of approaching your lecture: I never bring notes with me in the lecture theatre, so mind maps play an important role for me. If I held a single document with me while lecturing, it would probably be a mind map for the session I was attempting to deliver!

Mindjet is easy to use. To start, create a new map by pressing the + icon on the top left hand side of the screen (in mindjet), give it a title and save it somewhere. Then long press anywhere on the screen and a pop up will appear: enter some text or an image (which you can take from your iPad’s camera, or that you import from your Camera Roll). Then press anywhere on the screen and your first piece of text or image will appear on the map. Hold it, and a set of arrows will appear, enabling you to link a second piece of text (or image) to the first one. And so on… We will cover it in one of the forthcoming training sessions.

Connectivity

I find Mindjet useful, not because it is a powerful app (it is pretty simple, but then my mind maps tend to be pretty simple!) but because the connectivity options are pretty useful:

– email to yourself (or anyone): once you have created your map, press the Share icon to email the structure of your mind map to yourself or anyone else. It will also automatically attach a pdf version of the mind map

– save in your dropbox: Mindjet can save your  mind maps into a dedicated folder on your dropbox, which means you will never lose it

Give it a try. It is an easy to use app, and the help file is designed like a mind map – click to expand individual topic and you will get started in no time.

Bookmark synchronisation across multiple devices

Over the past year I have used various tablets, running both Android and iOS. Although at first it feels like having yet another device, there are ways to set them up so that you can enjoy the same experience, whichever device you are using.  Having all your bookmarks synchronised across multiple devices is of great help if you are looking to minimise the inconvenience associated with the use of different devices.

Android tablets

Android tablets work best with Chrome, Google’s lightweight and probably best browser around. Your android tablet automatically imports your Chrome bookmarks and keep them in sync. If you are using a different browser (Firefox, IE or Safari) best to export your bookmarks as an HTML file, and import them into Chrome – even if you do not intend to use Chrome as your mainbrowser. As long as you set Chrome with your Google account, all your bookmarks will automatically appear on your tablet and be kept in sync at all times. So changes made on the tablet will reflect into Chrome, and vice versa.   Unfortunately the feature is not available on Android phones as they do not make use of Chrome, but the feature will be rolled out as phones get upgraded to the latest version of Android, Ice Cream Sandwich aka Android 4.0 for which Google has just released Chrome.

IPads

IPads work best with Safari, and you do not have to use a Mac to operate Safari – download Safari for both Mac and PCs running Windows Vista/7. On the iPad, Safari comes pre-installed so you don’t have to download it. As long as you activate iCloud on your iPad (go into Settings/iCloud and switch on bookmark sync) all your bookmarks will be in sync. To import your bookmarks from IE or Chrome into Safari on the desktop, you will need to export them from IE or Chrome into an HTML file. Then, double click the file and the list of favourites will appear in Safari. You can then arrange them into folders in Safari. As long as you have downloaded and activated iCloud (look for a forthcoming post on iCloud) your bookmarks will be kept in sync between Safari on the pc and Safari on the iPad – and the synchronisation is instantaneous!

Alternatively, Google has now released its (free) Chrome browser for iPads. The only downside of Chrome is that you can’t set it as your default browser on the iPad – this is one of many annoyances with Apple’s walled garden. This means any http link will automatically open in Safari, not Chrome. You will have to launch Chrome, then copy/paste the url in order to open it in Chrome. Having said that, I read Chrome is performing very well on the iPad. If you use Chrome, log in as yourself and all your Chrome bookmarks will automatically sync across all your Chrome devices (web, iPad and of course, Android devices).

Having all your bookmarks in sync across multiple devices is a winner and a real productivity boost.

Getting started with your new iPad (How-to Guide 2)

The second guide in the series is now available. Entitled Getting Started, it includes videos with step-by-step instructions covering:

1. Managing content: why you may want to backup your iPad using iCloud or iTunes. The section also covers the University’s policy on cloud computing (to be reviewed)

2. The basics in getting started with your new iPad: the App store, connection to wifi, email set up and connection

3. Features associated with the device: multitasking, security, connecting your iPad to your mobile phone for wifi access, adding bookmarks to the web browser

4. Useful apps: the guide makes references to Apple’s iPad official user guide which has details of apps that come pre-loaded on the iPad (such as Safari, PhotoBooth, Mail etc.). Outside of these I would particularly recommend Evernote and Dropbox which will be particularly handy given the limited storage space available on the device.  These apps will have their own guide, to be produced shortly.

Download

You can download the guide as an ebook – make sure you have Apple’s iBooks installed on your device.

Setting up your iPad (How-to Guide 1)

Cath has kindly produced a guide to set up your iPad, coveringiPad SetUp

1. Connection to Leeds wifi network

2. the steps you need to go through while switching your device on for the first time

3. the creation of an Apple ID

4. the setting up of iCloud, which enables you to backup the content of your iPad on to Apple’s servers.

5. the setting up of Find my iPad, a useful security device that allows you track the movements of your device should you get it lost or stolen

Download

The guide can be accessed from your iPad in two ways:

– through a pdf document – make sure you have Adobe Reader installed on your device. Alternatively, the file will open in iBooks, Quick Office, Cloud On and Save2PDF if you have any of these apps installed

– through an ebook – make sure you have Apple’s iBooks installed.

Save2pdf for iPad

An app that attracted my attention is Save2PDF for iPad which enables the conversion of emails, documents, contacts and webpages into pdf documents.  A key feature of the app is the merging of several documents into a single PDF file even if they are of completely different formats. Which means you could create a pdf document made of separate documents such as spreadsheets, charts, text, webpages etc.   This sounds really interesting..!

You can read about the app here – retailing for £3.99 I will test it in the next few days and report back on this blog.

CloudOn for iPad or Office in your pocket


An app that has just been released in the AppStore is CloudOn for iPad – previously only available in the US and Canadian app store.Image

What’s great about the app is that

(1) it integrates with your Dropbox account, Google Drive and other popular cloudservices

(2) it allows you to edit your Dropbox documents (and create new ones) using MS Office software, How they manage to do that I don’t know. But with the app you have a fully funtional version of Microsoft Office which may make Quick Office and the like completely redundant.

The downside of Cloud On is that it requires a live Internet connection to work – this is because it connects to Microsoft office servers. This is unlike Apple’s suite of Office software, Quick Office HD Pro and Documents to Go – all of which will be reviewed here in due course.

Try it for yourself – follow the link for the free download or take the tour here

Meanwhile Microsoft is widely expected to bring a version of its Office software on the iPad and on Android. The word on the street is that Apple and Microsoft will be joining forces for the launch of the iPad 3 early in March – there have been reports of a working Office app for iPad, although Microsoft has denied its existence. Clearly someone saw a live demo of the app running on the iPad (see pic) so someone is lying…! Although doing so would promote the platform of one of Microsoft’s main competitors, it would strategically makes sense if Microsoft does not want to fall into irrelevance. Until such a time, CloudOn will fill the gap – give it a try. Why they are giving it away for free I am not sure, office workers would happily pay for sticking to what they know best, i.e. Office.

Meanwhile, look for a forthcoming post on Office editing software for the iPad…

Synchronising Gmail contacts with the iPad

One issue I’ve experienced from the start is the lack of built-in capability to synchronise your Gmail contacts with the iPad. This can be a pain if, like me you have come from Android and migrated to iOS, or if you’ve got your main contacts listed within Google servers.  There are apps that allow for synchronisation between the two devices but they’re not free and neither have been a straightforward affair.

There is a simple way which I have just discovered, thanks to the beautifully crafted Appstart which I mentioned in an earlier post, produced by appadvice.com and linked to by the iPads for education’s website, maintained by a consorium of Australian schools that trialled the use of ipads in secondary education. That involves setting up your Gmail account as a Microsoft Exchange server, instead of selecting “Gmail” in the list of email providers in the Mail app. If you have set up an Exchange account on the iPad to access your Leeds emails and calendar, this won’t be of much use as we are only allowed 1 connection to an Exchange server, in which case jump to the next section of this blog.

1. How to set GMail as an Exchange server

  • In Mail / Accounts select “Ad Account”, then “Microsoft Exchange” – instead of the built-in GMail account.
  • Enter your Google username and password, then hit “Next”
  • No comes the important part: on the next page you will be asked to enter a “Server” and “Domain”. For your email server, enter “m.google.com” and leave the domain field empty. Hit “Next”
  • On the next page you will be asked which Google services you want to sync with your device.  You can bring your Google Calendars and contacts directly on the device
  • Unless you want to delete all your existing Contacts and Calendars on your iPad, select the “Keep on my iPad” option when prompted
  • Once you’re finished, hit “Done” and you’ve managed to configure push notifications for your Google Mail account and get your GMail contacts synchronised across the devices.

Has anybody managed to get it to work?

2. Alternatively

Contacts sync for Gmail is the app I have used so far to import my GMail contacts onto my iPad but it requires manual synchronisation with the risk of resulting in duplicates an/or deletions of existing contacts on either device.

Projecting directly from your iPad

Below is the link to the VGA cable I used to project directly from my iPad. It is a standard iPad Dock Connector to VGA Adaptor, retailing at Amazon for £12.67

Image

Soundnote for iPad

“SoundNote is perfect for students. If you ever fall asleep in class, don’t worry — SoundNote’s got your back. Just tap what you wrote while you were awake, and SoundNote will play the audio to help you fill in the blanks”

SoundNote's websitePreviously known as Soundpaper, the app allows you to take notes and draw while recording audio/sound and it synchronises your notes with the audio file. Sounds idea if you’re prone to falling asleep during lectures or meetings…

App of the week on some obscure website, check their video review on YouTube and you can read the review by Techradar here. A student perspective on the app is available here.

You can check their official website or iTunes for screenshots and further details.

Useful apps for content consumption and creation on the iPad

The spreadsheet below has details of useful apps for content creation, consumption and collaboration on the iPad. Some of them are free, other available at a cost. When selecting an app

(1) always read the reviews and star rating for the app on the App store

(2) you may want to try the free ones first, then go for the more expensive ones later

(3) wait until the training session takes place, so that you can get a chance to interact with the app before purchasing it.

Bear in mind Apple does not issue refunds, so once you have purchased an app it is too late to change your mind.

The spreadsheet below will be frequently updated. If there is an app you feel worthwhile please post on this blog.

Making a start with your new iPad…

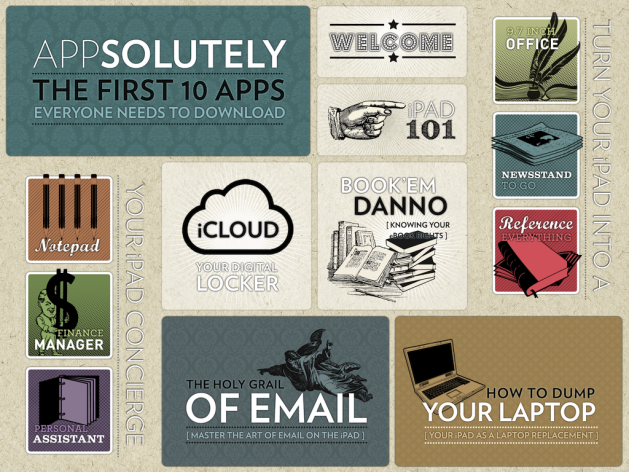
AppStart for iPad could very well be first (free) app anyone should download on their iPad to uncover the many functionalities of the iPad. No, it’s not a boring manual – it is a beautiful app (the designers have done a great job!) organised in many sections that allows the reader to understand how their iPad works, and what functionalities they can leverage.

It is organised around sections, for example “browse the web”, “organise your photos”, “the holy grail of email”. I  particularly like the “How to dump your laptop” section with their selection of productivity-enhancing apps, some of which we have trialled during the first pilot. Also noteworthy are their “9.7 inch office”, “the lowdown printing, or how to print with no strings attached”, “apps for students / moms / dads / musicians” and many other useful sections. They basically cover everything with a great selection of the most popular apps that help get the business done.

And it’s so beautifully done that you won’t get bored reading it!

Highly recommended. Go and download it now, it’s free. The very first app that should come pre-installed on all our iPads!