Using Notability to annotate documents

Notability is probably the most powerful app that enables you to (1) create typed and hand written notes, and (2) annotate pdf documents, as well as web clips and pictures. The app integrates nicely with Dropbox, where a copy of your notes can be uploaded for retrieval on other devices. The app retails for £0.69 on the app store.


Credits: iPadagogy’s YouTube channel

Productivity-enhancing features in iOS6

If you already own an iPad 2 or 3 you will have been offered to upgrade it to Apple’s latest operating system for iPads – iOS6.
With it came a range of improvements, additional functionalities, and the much reported (and criticised) replacement of Google Maps by Apple’s own mapping system, called Maps. This post is a summary of the main functionalities iOS6.

1. Improved Siri
Long pressing the home button launches Siri, Apple’s voice recognition software, initially launched with the iPhone 4S. I had never thought much of the functionality, given the inability of traditional voice recognition software to deal with foreign accents. But I must admit Siri seems to be working fine, even for myself with a strong French accent.
Siri can deal with a number of “actions” which can be launched using suitable words, for example take notes, create an appointment, do a web search etc. By long pressing the home button Siri appears on the screen and asks what it can help you with.

20120923-161613.jpg

If this is your first time, you may want to look at the guide, accessed by pressing the “i” button next to “What can I help you with?”. You are then presented with a guide that details ways to get it to perform actions on your behalf. Tapping the “i” button next to each action reveals ways to speak to Siri and get it to perform the task you want. To create an appointment in your calendar you will need to use the words “set up a meeting”. Alternatively you can use “meet with…”, “schedule a meeting…” Etc.

20120923-161701.jpg

20120923-161708.jpg

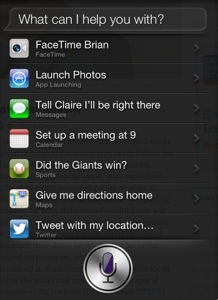
You can post to Facebook, tweet, ask it what the weather’s like, do a web search, type notes, set up meetings, create reminders, ask your current location and what’s nearby. It is a rather sophisticated (and possibly the most sophisticated) voice recognition software I have encountered, with the added functionality that it can perform actions on your behalf by speaking to it.
You will need an Internet connection for Siri to work, but it has been getting a lot more smarter (and useful) lately, so why not give it a try?

2. Improved notifications
If you found notifications to get in the way of what you are doing, reading or creating on the iPad, you will welcome the addition of a new “Do Not Disturb” functionality in your Settings. You can set times (e.g. 3-5.15pm) during which you do not want to get disturbed by notification of new emails, tweets, reminders and missed FaceTime calls.
To activate the functionality, go into Settings and slide Do Not Disturb to ON. Then, go into Notifications and set the times when the Do Not Disturb function is to be activated. You can set exceptions to the rule too.

3. VIP Mailbox
While using emails it can be difficult to distinguish the wood form the trees. And lets face it, some people are more important than others, right? With iOS6 comes VIP Mailbox, a new inbox in your Mail app.

20120923-161811.jpg

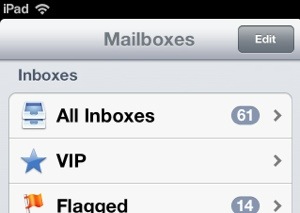
You can select specific senders and add them to your VIP inbox by tapping onto the sender’s name in any email, then tap on “add to VIP”. Emails from those senders won’t be moved from your mailbox, but only those emails will be displayed in your VIP mailbox should you wish to monitor emails from specific senders.

20120923-161851.jpg

4. Clock
This may sound silly but the lack of built-in clock (and alarm) functionality on the iPad has always been a bit of a let down for me. With iOS6 Apple has produced a great Clock app which comes pre-installed – complete with world time (for different cities) and an indication of what the weather is like in these places. It only deals with capital cities, from what I can tell – so you will have to use London for Leeds but never mind….

20120923-134549.jpg

The clock app comes with an Alarm, Countdown and Stopwatch tabs. The Alarm functionality is pretty good – you can set a number of alarms for different times, repeating on selecting days and the app displays your alarms on a spreadsheet-like interface.

20120923-161942.jpg

20120923-161948.jpg

5. Better integration with Facebook and Twitter
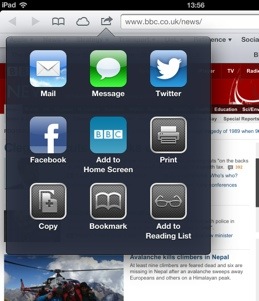
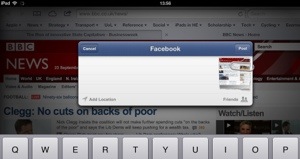
While Apple got busy getting divorced from Google and removing all Google apps on iOS6, they also got closer to Twitter and Facebook – to the point of integrating these two services deep throughout the operating system. No need to launch the twitter app to tweet, or the Facebook app to update your status. You can now post to both platforms from within the drop-down notification area, from within the browser, and from within the Photos (and most other) apps. Tap “Share” from within most apps, and you are now presented with a revamped menu that includes twitter and Facebook.

20120923-140612.jpg

So if you come across an interesting web page you can now share it with your followers by using the Share button – it will attach the web page as a picture to your tweet or Facebook post. Easy.

20120923-140640.jpg

20120923-140651.jpg

You can also now tweet or post to Facebook using the “tap to tweet” and “tap to post” function in the Notification area from your home screen and anywhere on the device.

20120923-140658.jpg

6. Offline web reading
Reading an Internet page offline was virtually impossible, unless you used the excellent Pocket app. Until now. You can now save a page for viewing later by saving it into your “Reading List” on the browser, and it will display later – even if you don’t have an Internet connection. Saving it is a straightforward process: display the desired webpage in your web browser while using wifi, tap the Share button then “Add to Reading List”. Done.

20120923-141649.jpg

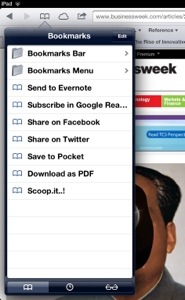
Next time you are in a plane, open your web browser and go to your Bookmarks. You will notice three tabs at the bottom of the menu: Bookmarks, History and Reading List.

20120923-141909.jpg

Go into your Reading List and the web page you saved earlier will be there. Tap on it and it will display in your browser, despite the absence of an Internet connection.

20120923-141955.jpg

7. Better integration of cloud-based storage services (e.g. Dropbox) into Apple’s iWork suite of apps (Keynote, Pages, Numbers)

This is a fantastic addition – until now, there was no easy way to edit or create a document, spreadsheet and presentation in Apple’s Pages, keynote and Numbers and getting it to send the file to your Dropbox account. The functionality is now built-in. In Keynote, tap the “Share and Print” menu, and you’ll notice a new “Open in another App” menu that links to your Dropbox and any other other app that supports the file. This works in Pages and Numbers too. The app will save the file in the MSc Office format, including pdf before uploading it to your Dropbox. Alleluia!

8. Update apps without entering your password

With each update notification came the prompt for your Apple ID password. This was cumbersome. With iOS6 the iPad will no longer ask for your password before updating existing apps. If you are paranoid about your security you can revert to the old systematic prompt in the Settings.

9. Browser tab sync across iOS devices
A useful feature for those of you who own both an iPad and a reasonably recent iPhone. On both browsers you will now notice a new icon by the address bar representing a cloud. Tapping the cloud reveals titles of web pages currently opened in the browser of other iOS6 devices, such as your iPhone. This is useful should the webpage you are intending to read on your iPhone does not quite fit the smaller screen – switch over to the iPad, tap the cloud icon and the web page will be there, waiting for you.

20120924-064434.jpg

While a useful addition, it is not revolutionary: Google’s Chrome browser has offered tab syncing on Chrome across the desktop and Android devices for some time. Still, a worthy addition.

10. The let down

Apple’s divorce from Google means no YouTube app, and no Google Maps app either. If this is a problem, you can still access Google Maps on the iPad’s browser at http://maps.google.co.uk. Once the page has loaded, you can create a shortcut on your home screen by using the “Share” button and tap onto “Add to home screen”. Apple’s own mapping efforts, and the decision to remove Google Maps from the OS have been criticised, with towns showing in the wrong locations and railway stations in the middle of the ocean. Never mind, they’ll get there eventually. Apple said improvements would come later. Traffic data on Apple’s Maps come from Tom Tom. The built-in navigation functionality does not look too bad, but public transport users will have lost Google’s excellent integration of transit schedules throughout the world, although Apple recently said they would work with transport providers to integrate the feature into their own mapping app. So wait and see…. Better laugh than cry is what might have come into the mind of that London Overground station supervisor….

20120923-225306.jpg

Google does not want to be left behind, and they’ve announced the release of both apps by the end of the year so watch this space…

11. Conclusion

Evolution, not revolution. A welcome refinement of the OS with a clear focus on making us more productive than ever. The days when all we’ll need is an iPad to get on with our daily lives are getting closer. Definitely a worthy upgrade.

Have I missed something?

Styluses for academic use

20120905-203030.jpg

There are many stylus out there for editing documents and hand writing on the iPad – Amazon UK lists no fewer than 112 products. Joachim at academiPad recommends the Adonit Jot Pro Touch stylus which he ranked first for precision of hand writing. On Amazon UK you can get it for £24.99. The stylus has a ball point and a transparent disk in lieu of the rubber nib (for added precision).
Macworld recently ran an exhaustive review of iPad styluses to include the Adonit Jot. Their review is broken down by pen type, I.e. Nib (rubber) styluses, multifunction stylus (typically they incorporate a real pen to write on paper and other functionalities) and unconventional styluses. In their review the Adonit Jot Pro does not perform badly either so it sounds like it could be a very safe investment. Check Macworld’s review here and click on the pen’s name for the full review. A nice round up of the best styluses is also available with a few runners up.

Something to bear in mind if you start hand writing in your iPad….
An important limitation of annotations created through hand writing is that your resulting notes won’t be searchable, unlike annotations entered using the keyboard. So if you use your atylus to edit a PDF handout using Good Reader, you wont be able to search through your own notes. But if (like me) you become addicted to Evernote, you will benefit from their clever OCR technology which enables for indexing hand writing notes and searching within them. And following Evernote’s acquisition of Penultimate, you can now sketch notes and diagrams on your iPad using a stylus and save them to Evernote for easy retrieval and searching. Download Penultimate for free and check the video here to find out why your stylus + Penultimate + Evernote = marriage in heaven..!

20120905-205208.jpg

Annotating PDF documents on the iPad: some of the best apps out there

A great website with tips and interesting articles about the use of iPads in academia is academiPad maintained by Queen University’s PhD student Joachim Scholz. In January Joachim posted a great article about the best ways to annotate PDF documents directly on the device. With his permission I reproduce here a summary table of the features of 13 PDF annotating apps (click the image to enlarge). Not all those apps perform the same functions so head for the original article to find out what type of user you are (from the penny pincher to the PDF management master) and what apps may actually be providing you with the functionalities you are after. If you are after a good all rounder, Good Reader might be the one for you  – we mentioned it quite a few times already.

If you are considering editing PDF documents on the iPad and you don’t want to waste money trying out various apps, you will find Joachim’s article invaluable.

20120905-195921.jpg
Credits: The Ultimate Guide on How to Annotate PDF files on the iPad, 2012

Uploading Quick Office HD Pro documents to your Dropbox account on the iPad

If you are wondering how to upload documents from Quick Office Pro to your Dropbox account, there is a way and it is a very straightforward process….

  •  Open Quick Office Pro HD on the iPad and notice on the left hand side both your iPad’s drive (“on Nicolas’s iPad”) and any other cloud-based accounts you might have set up (Go to Settings to set them up). My Dropbox account is referred to as “Nicolas Forsans” in the screenshot below. You can also see my GMail account below it, followed by my Evernote account.
  • Identify the file you’d like to transfer onto your Dropbox account. For the sake of this tutorial I will transfer the default “File Manager How to.pdf” file which comes with Quick Office by default
  • In the same way as you would select the file and send it by email or to the bin (notice the icons at the bottom of the screen, one for the bin, one for email, one for sharing), long-press the selected file name and move it to the icon that represents your Dropbox account on the left-hand side of the screen. Note: I could do the same thing to send it to my Evernote account.

  • As you drag the file to your dropbox account, the file manager no longer displays files that are locally stored onto the iPad – instead it shows you the various files and folders that make up your Dropbox account. You can then drag the file onto one of the sub-folders or (and it ill probably be easier that way) just drag it to the root of your Dropbox folder by releasing it above the Dropbox icon on the left hand side, as I’ve done it on the screenshot – you can always go into your dropbox folder later on and move the file from root to individual sub-folders
  • Job done: your file now appears in your Dropbox account; Obviously you would use the same method to bin the local file by dragging it to the bin icon, email it or send it to any other cloud-based account you might have set up

Creating and accessing pdf documents on the iPad using Save2PDF

We mentioned Save2PDF as a useful app to create pdf files out of websites, documents, contacts and images directly on your iPad. What I did not mention is that Save2PDF is also a good way to access pdf documents while on the go with no wifi connection – as long as your files are stored locally on the device.

In this post I will show you how to create a pdf file using the app, and how to access them for reading on the go. Click on the screenshots to enlarge them!

Creating pdf files

1. Download Save2PDF from the app store and open it on the device. By default, the app will list a file called “Getting started” on the right hand side of the interface. This file comes pre-installed on the device when you download the app, which is why it appears on your file list. This file is a .txt file, and here we will convert it into a pdf document.

2. Select the file by tapping onto it once, and its content will appear in the right hand side window within the app (screenshot)

3. To convert it into a pdf, tap the pdf icon on the top right hand side of the screen (screenshot). You will be presented with a menu similar to one shown here

4. From this menu, you can email it to someone (or yourself) or preview the result. We’ll use the Save function to create a pdf version of that .txt file. Doing so will result in a prompt: where do you want to save the file? We have several options here.

5. Option number 1: save it into the “Documents” folder, as shown by default. Doing so would enable you to save the file locally, and therefore access it without the need of a wifi connection (for example, during a long flight). Click on “Documents”, and the file is automatically saved. You are then asked if it is okay for the app to leave this screen – say Yes, and you return to the default screen. You will notice your file list now includes not just the .txt file we started with, but also the .pdf version of that .txt file (screenshot below). You can use Save2PDF to access pdf files stored in your “Documents” folder: select the .pdf file by tapping onto it, and its content will appear in the right hand side window within the app. You can also view your pdf file in any other app that supports it – see below for more on this.

6. Option number 2: save the file onto one of your cloud services such as Dropbox. By doing so the app will save the output in your Dropbox, box.net, Google Docs or iCloud account and the file will be available from any devices (smartphones, tablets, desktops and laptops) that have Dropbox (and the others) installed onto. If you want to save your output onto your Dropbox but also want the file to be available on your iPad without an internet connection, you will then need to go into your Dropbox using the app on your iPad, navigate to the location where you saved your file, and make the file a favourite by starring the file – this way, the file will be available offline on your iPad.

To save the output into your Dropbox, select the “Local files” drop down menu on Save2PDF (we used the “Documents” folder earlier on to save the file locally) and a number of cloud services will be listed. Tap on the one you want to use, say Dropbox. If this is the first time you’re saving a file into your Dropbox account, the app will ask you for your Dropbox credentials, and once validated your screen will display the folder structure of your Dropbox. Select the folder you want to output saved into, and the file is saved. In no time, it will be available on any other device your have Dropbox installed.

Creating a pdf file out of a website or pictures on your iPad

This is a very similar process to the one aimed at creating a pdf out of a file – the app has a built-in web browser, which means you can take a print out of a web page with you in a pdf format. To do that, select the “Web pages” tab at the bottom of the screen, and using the address bar enter the address of a website.

To make a pdf file out of pictures, select the “Images” tab – and by clicking the “+” icon you can import as many pictures as you’d like from your camera roll and convert them into a pdf file. This could be handy if you’ve taken screenshots of webpages for offline reading.

Once you’ve loaded the webpage or selected the images you want to convert into a pdf format, tap onto the pdf icon on the top right hand corner of the app and follow the steps mentioned earlier.

Viewing your pdf files on the go

We mentioned you could use Save2PDF to view a pdf file you created using the app. There are other (and better) ways to access your pdf files, for example using Amazon’s kindle app, Apple’s iBooks, Adobe Reader and any other office software which we will cover in another post later on.

How to export a pdf file created using Save2PDF for viewing into another app? Easy..!

1. Select the file you would like to access by ticking it (screenshot), then click the fourth con from the left within the app – it offers ample exporting opportunities, such as (1) emailing it to yourself or someone else, (2) exporting the file, (3) moving it to a different location, (4) renaming it, (5) duplicating it, (6) zipping it and (7) opening it into another app.

2. By selecting “Open with App…” you will be presented with a list of apps that support pdf documents, including iBooks, Adobe Reader, QuickOffice, GoodReader etc.

3. If you’d like to annotate the pdf file, I would recommend opening the file with GoodReader or Adobe Reader – both allow for inserting comments, highlighting text etc. If you’d like to save the file and keep it maybe for future reference, why not opening it in iBooks instead and the file will be presented in the same way as a book on a shelf. You can then create collections within iBooks, for example a “Reference” section and move the file into that particular collection. We’ll cover iBooks later on too.

Please feel free to sue the Comments section if you’d like us to cover anything else!

A selection of the best free apps for the iPad

The list is conveniently organised by categories so you can easily access free apps for the section you are most interested in… You can get the full list by following this link , courtesy of  Gizmo’s, or take a more focused approach by selecting individual links:

  • Best free apps for Home & Office – direct link
  • Best free apps for Image tools – direct link
  • Best free apps for Multimedia – direct link
  • Best free apps for Disk and File Tools – direct link
  • Best free apps for Desktops and Systems – direct link
  • Best free apps for Security and Privacy – direct link – including LastPass which Adam refers to this morning
  • Best free apps for Internet, Email and Messaging – direct link
  • Best free apps for Social Networks, Websites and Servers – direct link
  • Best free apps for Education – direct link
  • Best free apps for Health & Fitness – direct link
  • Best free apps for Games – direct link

Creating mind maps using your iPad

One of the forthcoming training sessions will look at the simple ways for you or students to create mind maps using the iPad. You will find several apps that do the job – one I have used is Mindjet (free) – a simple tool to create (simple) mind maps like the one attached to this post.

Why and when would you want to create a mind map?

Mind maps help structure your thinking about a particular problem, topic, discussion. It highlights the structure of your thinking, and the relationship between various components of it. I tend to use mind maps to structure my own presentations (the one linked to this post refers to a research conference presentation). I also create a mind map in the hour that precedes most of my lectures – I find them useful to remind myself of the structure of the lecture. Whether you might be interested in producing these maps depends on your way of approaching your lecture: I never bring notes with me in the lecture theatre, so mind maps play an important role for me. If I held a single document with me while lecturing, it would probably be a mind map for the session I was attempting to deliver!

Mindjet is easy to use. To start, create a new map by pressing the + icon on the top left hand side of the screen (in mindjet), give it a title and save it somewhere. Then long press anywhere on the screen and a pop up will appear: enter some text or an image (which you can take from your iPad’s camera, or that you import from your Camera Roll). Then press anywhere on the screen and your first piece of text or image will appear on the map. Hold it, and a set of arrows will appear, enabling you to link a second piece of text (or image) to the first one. And so on… We will cover it in one of the forthcoming training sessions.

Connectivity

I find Mindjet useful, not because it is a powerful app (it is pretty simple, but then my mind maps tend to be pretty simple!) but because the connectivity options are pretty useful:

– email to yourself (or anyone): once you have created your map, press the Share icon to email the structure of your mind map to yourself or anyone else. It will also automatically attach a pdf version of the mind map

– save in your dropbox: Mindjet can save your  mind maps into a dedicated folder on your dropbox, which means you will never lose it

Give it a try. It is an easy to use app, and the help file is designed like a mind map – click to expand individual topic and you will get started in no time.

Save2pdf for iPad

An app that attracted my attention is Save2PDF for iPad which enables the conversion of emails, documents, contacts and webpages into pdf documents.  A key feature of the app is the merging of several documents into a single PDF file even if they are of completely different formats. Which means you could create a pdf document made of separate documents such as spreadsheets, charts, text, webpages etc.   This sounds really interesting..!

You can read about the app here – retailing for £3.99 I will test it in the next few days and report back on this blog.

CloudOn for iPad or Office in your pocket


An app that has just been released in the AppStore is CloudOn for iPad – previously only available in the US and Canadian app store.Image

What’s great about the app is that

(1) it integrates with your Dropbox account, Google Drive and other popular cloudservices

(2) it allows you to edit your Dropbox documents (and create new ones) using MS Office software, How they manage to do that I don’t know. But with the app you have a fully funtional version of Microsoft Office which may make Quick Office and the like completely redundant.

The downside of Cloud On is that it requires a live Internet connection to work – this is because it connects to Microsoft office servers. This is unlike Apple’s suite of Office software, Quick Office HD Pro and Documents to Go – all of which will be reviewed here in due course.

Try it for yourself – follow the link for the free download or take the tour here

Meanwhile Microsoft is widely expected to bring a version of its Office software on the iPad and on Android. The word on the street is that Apple and Microsoft will be joining forces for the launch of the iPad 3 early in March – there have been reports of a working Office app for iPad, although Microsoft has denied its existence. Clearly someone saw a live demo of the app running on the iPad (see pic) so someone is lying…! Although doing so would promote the platform of one of Microsoft’s main competitors, it would strategically makes sense if Microsoft does not want to fall into irrelevance. Until such a time, CloudOn will fill the gap – give it a try. Why they are giving it away for free I am not sure, office workers would happily pay for sticking to what they know best, i.e. Office.

Meanwhile, look for a forthcoming post on Office editing software for the iPad…

IPad 3 tips: navigating the screen using your fingers

(contributed by a student on the course in 2012)

As I have used IPad 2 for several month, I would say that there are still many techniques i never heard before, but these techniques are very useful and efficient for users to know the charm of IOS.

Tips for navigating the screen using your fingers

1. when you put all five of your fingertips on the screen and pinch them together, you would find the home screen without tapping the home button.

2. when you place four of your fingertips on the display and slid them up to the screen, the multitask bar would be shown as well as the way you double tap the home button.

3. when you put four of your fingertips on the screen and slid them to left or right side, this would quickly help you switching between apps which you are using now.

These three tips would help you get rid of the home button and extend its life expectancy.